Showing posts with label refashion. Show all posts

Saturday, September 8, 2012

T-Shirt Transformation : Shirt to Fringe Scarf

I have really been going crazy with all of my t-shirt transformations lately! These are so fun and really easy to do! It's great to bring something plain and ordinary to life by adding your own twist. I am a fan of showing your personal style, and what a great way to do this with designing your own creation from a t-shirt!

I was on pinterest and came across a fun fringe scarf idea several weeks ago. Check it out here! With all my other projects going on I hadn't had time to do this one until today! A few other bloggers have done this fun diy too! Check out this one over at Ohh Em Gee Boutique!

Check out my before and after pictures and read the super easy instructions on how to make your own fringe scarf!


What you need:
 
T-shirt
Scissors
 
 
Directions:
 
1) Grab a t-shirt
2) Cut the shirt about half way down. Make sure your shirt is laying flat so you cut both sides.
3) Take your scissors and cut slits from the bottom up going about half way up the length of the shirt.
4)Check out the picture to see how I spaced them.
5) Once you cut the slits your fringe has formed! Pull the pieces downward to stretch them.
6) I then stretched the top of the shirt so it would "roll".
7) Wear your super cute new fringe scarf!
 

Photobucket

Friday, August 31, 2012

T-Shirt Transformation : Plain Tee to Fab Off The Shoulder Top


Have you noticed my fascination with tee shirt transformations lately? I have been doing quite a few of them! Some of my transformations haven't been shown yet, so keep an eye out! Last week I showed you how to turn a plain tee into a cute skirt. If you haven't seen it yet check it out HERE! This was one of my Lucky contributions! You can view those HERE!

I love taking something plain and "boring" and turning it into something fun and unique! This is such a simple way of showing you own sense of style with a touch of flair! Here is my T-Shirt transformation! Check below the picture for a quick how to!


How To:

1) Grab a plain t-shirt.
2) Decide on your design. Hearts, stars, quotes, it's totally up to you!
3) Tape or place your decal where you want the design to be. I decided to do stripes at a slant.
4) Grab your fabric paint. These are really affordable and can be picked up at any craft store.
5) Start painting! I waited about 5 minutes and added a second coat where needed.
6) I wanted to add an anchor, so I put the decal on top of my stripes. I wanted to slant the anchor the way I slanted the stripes.
7) Paint some more!
8) Remove your decals, tape, etc and let your shirt dry for about 4 hours. I waited until the next day.
9) I cut the collar off my shirt to make an off the shoulder style top.
10) Wear it!

How easy was that? I have several more upcoming DIY projects and ton's of great new fashion and style posts! Will you be making your own transformed tee?

 
Photobucket

Tuesday, August 28, 2012

Dresser Revamp : DIY project

My husband and I found this old dresser, and I had the bright idea to grab it! It was free, and you can't beat that! The dresser needed some work, so we decided to use what we already had on hand and see what we could do. Total cost for this dresser and the revamp : Zero!


This was a great sturdy wood piece, but needed some work! One of the drawers was out and in pieces. This was an older piece and also needed some updating!
 
 
I really didn't like the drawer pulls, so I knew those had to go!
 
 
There were a few dings scratches that we filled in with wood putty. If you ever need to fix wood this stuff is great. You can pick it up at any hardware store or Walmart. It's very affordable!
 
 
We took out all the drawers and prepared to sand down the places that needed repair.
 
 
Then my husband put the broken drawer back together!
 
 
We had some flat black paint so decided to go with that just to see how things would turn out.


After we had a matte finish dresser I wanted to add a little bit of flair! I used one of my stencils and some gloss black paint to add detail!


Now time to add the hardware! These are chrome fixtures, but unfortunately didn't turn out too great in the picture! We lost the daylight so finished inside!


This was a fun project and we now have more clothes storage! We can always use that!


Photobucket

Friday, August 24, 2012

T-Shirt to Skirt : DIY Refashion

I've been doing a ton of projects lately and wanted to share this one with you! For this I used a plain gray t-shirt and transformed it to a skirt! Check out the before and after picture then follow the easy directions to make your own!


T-Shirt Refashion

T-Shirt Refashion by flairbybrandi featuring silk scarves

DIRECTIONS and SUPPLIES:

For this project you will need:
* An Old or New T-Shirt slightly oversized
*Scissors
*Needle/Thread, Sewing Machine, or Double Sided Fabric Tape (the fabric tape is just like sewing!)
*Scarf, Ribbon, or belt

Super easy directions:
1) Cut the top of the t-shirt across the sleeve area and slightly up at an angle as pictured above.
2) Once your shirt is cut fold down 2 times in 1-2 in sections.
3) After your shirt is folded there will be an upside down "V" on both sides of the actual shirt hem.
4) Sew or use iron on fabric bond to hem the bottom of the fold across the front and back. Leave the sides where the "V" is open.
5) Take a scarf, ribbon, or belt and feed through the "V" sections until they meet on one side.
6) Put on your new skirt and tie or fasten your belt!

That's it! How easy was that? This project took under 30 minutes and didn't cost me a penny! I hope you enjoyed this DIY! Let me know how yours turns out!


Photobucket

Friday, May 11, 2012

Transform Shirts to A Dress : DIY Shirt refashion

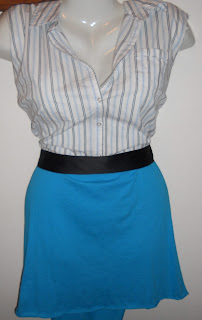
I was looking at a few old shirts and decided I would transform them into a cute little dress. Here are the pictures of before and after! Hope you like it!!


Here are the two shirts I used for the project. The top shirt I cut off the bottom about 4 buttons from the top. The second I cut under the armpit and across the front as shown.


I turned them inside out and layered them like so. Then I used the iron on tape to secure them before I attempted to sew them together.(Remember I don't sew lol.)


I added a ribbon to the mid section for extra detail. The top shirt has the aqua color and black so both colors are now below the skirt.


And here is how it turned out. I plan to wear this tomorrow!!!


The dress form that the dress is hanging on is flat on the back, so you can't see the actual form of the dress, but I am happy with how it turned out. I will make sure to post pictures when I wear it tomorrow!! Happy Friday everyone!! Hope everyone has a great weekend!


Photobucket

Monday, April 23, 2012

Sparkle and Shine : Sequin Shoe DIY

There is no secret that sequin and glitter shoes are a great fashion statement! These shoes can range from heels, sandals, flats, flip flops, and more. I loved the look, but so many of the cute heels are over 4 inches! I am 5'9 without shoes, so the thought of being over 6 foot doesn't thrill me! My husband loves me in heels, but since he is only an inch taller than me I try not to go any more than 3-4 inches in heels!

These shiny and sparkly shoes are everywhere! These great shoes are being made not only in a range of styles, but by a range of designers! From Christian Louboutin and Valintino to your Target and Payless Stores everyone has their version of this popular shoe!


Here are two of  popular brands of the super shiny shoes! Left is Louboutin and the right is Miu Miu. These two pairs will cost into the thousands!! I decided since I've been on my DIY kick I would make my own! The entire project cost less than $10!

Here's what I did... (and what you need!)

Supplies:
Shoes (Any style is fine. I used pumps)
Modge Podge
Paint brush or sponge brush
Glitter
Tape

I picked up a pair of black pumps at Goodwill. I wanted a rounded toe pair, and found the perfect ones! These are by H&M and cost $2.00. You can use any color or style of shoe, but this was my preference!


Here are the black shoes. As you can see they have a few minor scuff marks, but that is totally fine! It will all be covered soon!


I took my modge podge and my glitter and mixed them together in a cup. The amount of glitter is up to you. It depends on how sparkly you want your shoes! I'm going all out on mine!


Next you can tape the heel or bottom of your shoe. I started to tape them, but then decided I didn't really need to do this! It isn't totally necessary, but you will want to make sure you are neat in the painting process or you will end up with glitter everywhere! Also if you intend to glitter the heel you won't need to tape that area only the under side of the shoe.


Now here's the fun part! Start painting on the glitter! This is my first coat.


And the second coat. Don't worry the modge podge will dry clear!


I put on about 4 coats to get the coverage I wanted! Then it was time to tape the bottom side of the shoe. And glitter the heel. My initial idea was to leave the heel plain, but I changed my mind! That happens sometime (me changing my mind lol).


After I glittered the heels I peeled the tape off the back and decided for an extra pop I would paint the bottom of the shoe a mauve/burgundy color. I would have loved to go for a hot pink, but ran out of that color! For the bottom I used a small bottle of enamel paint. And gave it two coats. Then I brushed a layer of just the modge podge over the shoe one last time. I did this to set the glitter!


After it dries you have your final product! Super sparkly sexy glitter heels for under $10! You cant even beat that deal at payless! I'm happy with my new shoes! Let me know if you try this out! I would love to see pictures of your shoe creation!

These aren't totally dry,but you can see how they will turn out!

Xoxo,
Brandi abcdfghijklmno

Thursday, April 19, 2012

DIY : Easy Bangle Bracelets

I came across this idea when I used all of the ribbon on one of my spools! It was perfect bracelet size, so why not make a bracelet? This is a super cheap and fun way to create different colors and styles of bangles! The more you have the more you can make, and stackable bracelets are in right now!


Here are the spools I had. Once it was empty it was time to get started on my bracelets! You can use ribbon or extra fabric from your other craft projects! I used the fabric from some other DIY projects featured on my blog!


The picture was blurred, but this is the empty spool once the top paper was removed. Here you can see you are left with a circular piece of hard cardboard.


Here are a few of my finished bracelets. The blue is an old dress tie, the floral is a shirt I turned into a spring tote bag, and the pink is another old shirt. The bottom is a cuff bracelet made with a dress I turned into shorts.


Hope you enjoyed and have fun making your own bangle bracelets!!

Xoxo,
Brandi abcdfghijklmno

DIY: Revamp Old Clothes

Today I had more fun taking the old and making it new. I revamped two shirts and one dress. This is a fun and easy way to change your wardrobe! You may have something old that you love the pattern on, but the item itself is out of date. An easy fix it to personalize it and change it into something new. Here are a few of the items I did today! Hope you enjoy!

Old Guns N Roses T-Shirt. I loved them growing up! I am not big on wearing T-Shirts out and I can't say a T is much of a fashion statement!

I cut off the sleeves, cut the neckline, and cropped the T about 4 inches. A cute scoop neck tank! Great to layer with another tank under!

This was an old dress. The bottom half of the dress is shown in the picture. The dress needed a makeover!

 I cut the bottom off the dress and turned it into a pair of high waist shorts. They are on a dress form, so its hard to see how they would actually fit. I really liked how they turned out! PS: This is the first pair of shorts I ever made!! Did I mention I didn't use a pattern either?

A plain white V-neck top. The bottom hem was coming apart, so I decided it was time for a transformation.

I cut off the sleeves, cut the neckline, and tied some extra material to the straps. I also added some rhinestones for some shine. The bottom of the shirt (that I also cut off) was turned into a belt for my new high waist shorts!


Hope you liked todays projects! I had fun making them! Check back soon for more refashions of clothes, jewelry, furniture, and more!!

Xoxo,
Brandi abcdfghijklmno

Friday, April 6, 2012

Refashion A Mans Shirt

I've seen a few things about refashioning old to new. Here is my version! I took a mans dress shirt and transformed it to a cute dress! I hate to sew, so there is no needle and thread involved! I used fabric glue and double sided iron tape. Super easy!!

Here is the shirt!


I took a pattern I liked and cut it out.

Then I put the pattern across the shirt right under the collar.

I traced the pattern onto the shirt and cut it out with scissors.

Then I added lace. I put the lace on with washable fabric glue so it would be permanent and would dry clear. I was going to leave the sleeves, but at the last minute I cut from the edge of the seam up to the collar. I cut the entire section of the top half of the shirt and left the collar then used double sided iron tape to fold down and hem the edges. This made it into a halter. (Again last minute! I didn't have time to take pictures of those steps!)

And here is my halter dress made from a mans dress shirt!


Xoxo,
Brandi abcdfghijklmno