Showing posts with label diy. Show all posts

Friday, May 6, 2016

House Remodel Part Two : Den

Today I thought I would cover part two of our house remodel and update. This post will cover the den updates. As many of you know we did polished concrete a few years back, but decided to go back to carpet.

This is the before...

First we needed to fix any water damage issues. That is another story for another day! We primed and sealed the floor again! Check below each picture for details!


1) The concrete floor
2) Changing the paint to gray
3) Prime and Seal floor
4) Floor after it was primed and sealed.


1) Laying carpet matting
6-8) Laying and seaming the carpet


My grandmother passed away almost 9 months ago and we decided to incorporate a few of her old pieces into our house. We have her antique record player, ship wheel mirror, lanterns, and custom coffee table my grandfather made. They remind me of my grandparents and I am happy we used them. I will have a tour of the house on my youtube channel soon! Don't forget to go check it out by clicking HERE!

Love and Hugs as always!


Tuesday, April 5, 2016

House Remodel Part One: Kitchen

I said that I was going to post this several months ago, but it took longer than I thought. I finally got around to do it! I am going to do this in a series of posts starting with the kitchen! We have gone room by room and updated a few things and added a few new touches! 

A few years back we redid our den floor and opted for stained concrete. I liked it for the most part, but with our family it just wasn't a practical option to keep it that way. We decided that since we still have kids at home we would go back to carpet for now. Everyone still likes to lounge around and lay in the floor at times. Concrete isn't the most comfortable option for that. 

I will be doing our latest den transformation in the next post. Today we will focus on the kitchen!
Here is the kitchen before! The kitchen had never been updated and has looked the same since 1989! It definitely needed some work.


We didn't replace all the cabinets, but we do plan to refinish them. That has not been done as of yet! We just did the basics! I will walk through the numbers below each photo!


1) A quick picture of the floor before we pulled it up.
2) The crazy wallpaper! That was not fun to rip off!
3) We just pulled apart the old counter! 
4) The stove after we pulled it out. It was a built in type stove and was not fun pulling out either. It was hard wired into the wall and did not have the "normal" plugs that stoves have now. We had to rewire everything when we put in the new stove. Again not fun!


5) This is the insane mess that was the sink side of the kitchen.
6) Just pulled off the counter
7) New counter down and to measure to cut the sink.
8) The sink is installed with a new faucet!


9) Removed all the floor and had to scrape the remaining glue from the cement foundation.
10) Time for the walls.
11) Creme on top, chair rail, then blue-green on bottom.
12) Almost time to caulk and fill in the nail holes.


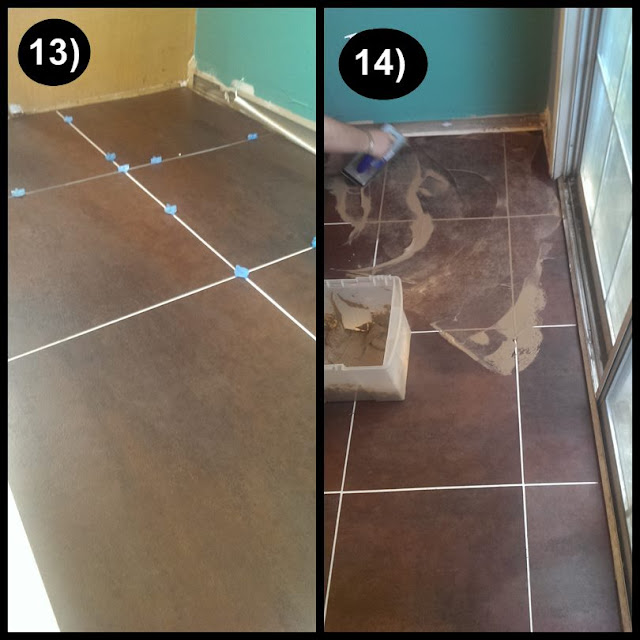
13) We primed and sealed the floor then put down the tiles. I measured with spacers.
14) Next came grout!

There was a good bit of clean up when we finished! We also bought a few new things to add to the decor. We are still working on the "finishing touches", but this is our current kitchen! I hope you guys liked this post! Don't forget to check out my posts on how to organize your cabinets!


Love and Hugs!


Friday, January 24, 2014

Den gets a makeover :Painted Concrete floors

I have been ready to get rid of our carpet for quite a while. I also considered the thought of painting the concrete! Rather than over think it I just decided to do it! Last week we woke up Friday morning and decided to rip up the carpet, so we did! It definitely wasn't really planned out! We ended up having to put the furniture in the kitchen, and let me just say that was no fun!!

I definitely like the results and think change is good!! I'm not saying that I will leave it like this forever, but for now I am glad we did it! Here are a few pictures and then our crazy and quite random video of what took place!


Check out the video of how we did everything!!


Hope you have an amazing weekend! We are planning to repaint the walls and redo the kitchen soon! Should I document that too?? Love and hugs!!

Monday, September 16, 2013

Quicky DIY :Vanity Project - Time to Revamp

I wanted to post this long before now, but things don't always work out like planned! This was a quick DIY transformation I did several weeks ago when I had some free time!

My husband and I were driving home from errands and this very old vanity was literally sitting on the side of the road to be picked up with the trash. No way! I was not letting that happen, so we grabbed it! Someone's trash is another's treasure, right? In this case I was happy we grabbed it!


Here is a shot of what it looked like when we got it.


Time to start sanding. I used a regular grit sandpaper and did it by hand.


This is a shot of inside the middle section of the vanity before sanding.
 
Close up of the fixtures. 


After I sanded the vanity I filled in some of the deeper worn areas with a wood putty and sanded those down. I didn't take pictures of that process, but its very easy. Wood putty comes premixed and ready to go. You simply apply a layer of it. let dry, and sand down.

While waiting on the putty to dry and continuing to sand the front side of the vanity I removed the fixtures and spray painted them a chrome silver color.

 
I also painted the drawers. There are two drawers on each side and the middle area that opens with the mirror. I decided on a black semi gloss paint.
 
 
Once they dried I put the freshly painted fixtures back on the drawers.


Here is a shot of the vanity before finishing with the drawers and fixtures.
 

The camera flash made somewhat of a reflection against the black paint in the before and after picture!

Sunday, September 8, 2013

"Face" Facts : Six Part Makeup Series to Break it all Down!

While under my blanket and cozy in bed I had an idea..."What about a makeup series?". That's when I normally get my ideas...when I'm laying there trying to fall asleep. It seems like right before I doze off something hits me and I'm back up jotting down notes or full out writing.

I will be doing a six part series on makeup and everything you need to know. We are going to break it down! I will go into detail about all the various makeups, brands, types, etc. It's going to be great! I will try to add in a few tutorials or instructional pictorials too. I've had several emails asking various questions that I will be answering in this series.

Makeup

The six part Face Facts makeup series will include :

Part 1 - From Primer to Powder: this will be everything you need to know from primers, concealers, foundations, and powders.

Part 2 - Highlighting, contouring, blushes, and bronzer.

Part 3 - Your face shape and brows

Part 4 - Eyes

Part 5 - Lips

Part 6 - Nails

Keep in mind each part will have details on what the different products do, how to use them to your benefit, tips and tricks, and more! Stay posted for part one!


Sunday, August 4, 2013

Fix Broken Makeup or Create a Custom Shade: 5 Step DIY

How many times have you ended up with a broken compact or shadow? I have countless times! How about your favorite shadow quad and one of the shades gets crushed? Most of us have experienced this on more than one occasion.

If broken makeup isn't your issue, how about finding that perfect shade of bronzer, blush, or powder? What about mixing shadows to create your signature shade? This is such a simple process and I'm going to show you how today in a few quick and easy steps!

Today I decided to work with some blush. I had a bronzer that wasn't quite deep enough to do the trick and a blush that wasn't a match either. I mixed the two together and was happy with the end result! Here's how to do it!


What you need:


Old blush, bronzer, powder, or whatever you decide to work with.
Something to mix and crush (old spoon, plastic knife, etc)
Isopropyl Alcohol
A container or compact

Step One:


Grab your broken makeup

Step Two:


Combine your makeup in one bowl or tin.

Step Three:


Grab your utensil and get to crushing that makeup! Try to get it as powdery as possible.


Step Four:


Put your new powdered mixture in a tin of your choice and grab the Isopropyl Alcohol. Mixing a small amount of alcohol to the powder will make it smooth and moldable. The bonus is all the alcohol evaporates and is totally safe to use in makeup!


Step Five:

 
Add the alcohol until the mixture is able to be smoothed and no powder is left. Just use enough so that it is pliable and moldable. Don't worry if you use a little too much, because it will evaporate! Then try to smooth it out and let dry overnight!
 
 
That's it! All you have to do is wait until the next morning and check out your new fab personalized shade or fixed compact! It is easy as that!


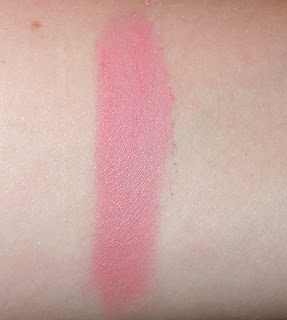
Here is a quick color swatch of the new shade! I wish I would have taken this in natural light, but I am happy with the results! The flash from the camera almost makes this a bit more pink than the natural light would have shown, but no worries! I will do a fun makeup look to follow this and my next post with the full look!
 
 
Check my upcoming post on creating fun eye shadow shades from those broken shades that you haven't thrown away yet! This is going to get interesting! Keep in mind you can do this with almost any of your powder based makeup! Who's ready to try this out?
 
Don't miss the next few posts on transforming old makeup! Hope you are all having a fabulous weekend!
 
To stay updated daily don't forget to follow me on :
 

Facebook

Pinterest

Twitter

Instagram


Xoxo,

Brandi


Friday, January 4, 2013

Favorite Pins This Week

I love pinterest! Its addictive, what else can I say! I have found so many recipes, projects, and fun ideas! I've also pinned a few myself! Here are my favorite pins this week. Click the pictures for the link and don't forget to follow me for more great ideas!

~ So funny! ~

~ Can't wait to make this! ~


~ Magic mike fans...this cracked me up!~


~ Love these pink lips!~

~Check out these great shoes!~

~ Look at this great idea!~

~How great is this? Tons of great tips~
Source: scarves.net via Rain on Pinterest

Aren't these great? I will be posting a few recipes I tried out next week! So far they have been great! Don't forget to check back for a few of my DIY projects and tips! You can follow me on pinterest by clicking HERE for more great ideas, funnies, and everything else!


Xoxo,

Brandi