Showing posts with label reuse. Show all posts

Thursday, December 13, 2012

It's Been A While! Update and Quick DIY

Wow! I haven't had time to write in quite a while! Life has so many twists and turns and for a while I don't think I knew which way was up! Things are beginning to settle (I hope) so I should be able to get back to my writing, projects, tips, etc!

October and November were super busy and several things changed in my life. At times it was a struggle, but I am slowly making my way back up.October was nuts! I turned thirty! Yikes!! I did post several things up until mid October but then life got busy! November was filled with craziness and mostly revolved around the kids! Thanksgiving was nice and spent with family and close friends...then there was Black Friday shopping!

I will admit that this year was my first big Black Friday shopping event. I went nuts! I shopped for a solid 10 hours! Most of those hours were spent standing in lines, but I did get some great deals and finished most of my Christmas shopping that day! Whoo-hoo!

This month has been very stressful so far...VERY. My husband broke my camera and of course I was not happy about that AT ALL! The next day the wireless router broke and the Internet was down. On top of that my husband almost died while working on a car. Yes, you heard me...

Ty was working on a car and was trying to lower the jacks. He was laying on the ground under the car (on his side) when the jack collapsed and the car fell crushing him under it. I heard a terrible noise and ran to see what had happened. Thank God my oldest son followed behind me. By the grace of God Bay and I were able to lift (yes we actually picked up that car) it off of him and pull him out.

We took him to the hospital and again by the grace of God he only had minor injuries. He cracked a rib and dislocated his rotator on his shoulder. The doctors said he should heal just fine. They also said if it wasn't for me and Bay pulling it off of him he would have been dead. Amazing! Here is a hospital pic I couldn't resist taking once he was home safe : ). Poor thing!

So now that all the drama and mess are over I am looking forward to things getting back to normal and better than ever! Enough with the bad stuff!


As I mentioned I haven't had time to do much for myself or too many "fun" projects but I thought I'd share this quick one with you! Don't worry I still have tons of DIY's to share,but that will have to wait until after Christmas! I don't want everyone to get hints on what they are getting!!!

~~~~~~PROJECT~~~~~~

I found this old table style jewelry box and of course it was FREE! I decided I was going to do a little revamping and turn it into a makeup vanity (super girly style). Here are the pics!!


First we sanded the wood (my hubby and son helped)


Then I had to pull out all the ugly red felt liner

After that It was time to paint and reline the drawers... I should have taken pics before it had makeup in it lol...then again I didn't have a camera at the time!


Super girly pink with black vine design


Of course I had to use my "froo froo" jar to hold my brushes! I made this a while back but it worked for what I wanted.

Super easy and super fast...not my best work by far, but I used everything I had on hand and didn't have to buy a thing! Total cost...FREE!!


I hope everyone is having a fabulous December so far! I will do my best to get back to my regular posts! Don't forget to check back for all the DIY projects and gift ideas I have coming up!


Xoxo,

Brandi


Thursday, April 19, 2012

New Style : Wrap Around Watch DIY


The new watch trend going around is the wrap around look. This look goes well with stackable bracelets too! The watches vary in price, but here are two I saw online. These are from La Mer and Avon. The La Mer retails for $130 and Avon is $40. There are tons of variations of the watch, but rather than go out and buy one I decided to make my own!


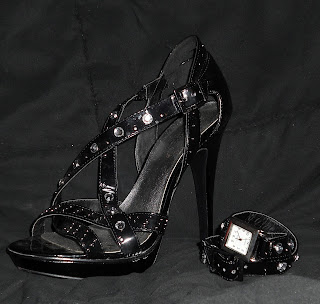
I had a pair of old shoes that I didn't wear anymore and they were perfect for this project! This was super easy to do! All I did was cut the straps off the shoes and sewed them to the watch face. You can use an old watch or pick up the watch face from a craft store.

Here is part of the strap that I cut off. The shoes already had a buckle, so there was no need to add another! This made the project even easier! I just attached the two sides to the watch and that's that!


Here is the finished watch! It is a shiny patten leather with rhinestone detail. The camera flash reflected off the material somewhat, but I love how it turned out!


Here is a picture of the shoe I used and the finished watch!


Hope you enjoyed! Check back soon!

Xoxo,
Brandi abcdfghijklmno


DIY: Revamp Old Clothes

Today I had more fun taking the old and making it new. I revamped two shirts and one dress. This is a fun and easy way to change your wardrobe! You may have something old that you love the pattern on, but the item itself is out of date. An easy fix it to personalize it and change it into something new. Here are a few of the items I did today! Hope you enjoy!

Old Guns N Roses T-Shirt. I loved them growing up! I am not big on wearing T-Shirts out and I can't say a T is much of a fashion statement!

I cut off the sleeves, cut the neckline, and cropped the T about 4 inches. A cute scoop neck tank! Great to layer with another tank under!

This was an old dress. The bottom half of the dress is shown in the picture. The dress needed a makeover!

 I cut the bottom off the dress and turned it into a pair of high waist shorts. They are on a dress form, so its hard to see how they would actually fit. I really liked how they turned out! PS: This is the first pair of shorts I ever made!! Did I mention I didn't use a pattern either?

A plain white V-neck top. The bottom hem was coming apart, so I decided it was time for a transformation.

I cut off the sleeves, cut the neckline, and tied some extra material to the straps. I also added some rhinestones for some shine. The bottom of the shirt (that I also cut off) was turned into a belt for my new high waist shorts!


Hope you liked todays projects! I had fun making them! Check back soon for more refashions of clothes, jewelry, furniture, and more!!

Xoxo,
Brandi abcdfghijklmno

Friday, April 6, 2012

Revamp Old Shoes

My old shoes need a new look. The reason:my dog at the heel!


This is Penny
(the shoe eater)


Here is a step by step guide on how I revamped my shoes.


The heel is obviously destroyed!


Next I cut off the remaining leather that covered both heels.


I added a coat of gloss enamel paint (this is actually a model car type of paint I borrowed from my kids!)

Then I hammered the bottom of the heel back on. I took the bottom from another old pair of shoes. I added rhinestones for sparkle! Rhinestones on shoes seems to be quite popular now, so I thought I would try it!

I used a craft glue to stick them to the heel. Any craft glue that is waterproof and dries clear will work. You can get craft glue from walmart for about $2.00.

I added some lace and made some bows for the back of the shoe. The glue dries clear and the picture shoes the wet glue. It almost has a bluish tint.

Here are the bows I made with the extra lace and silver ribbon. I attached them with the craft glue to the back. The glue sets fairly fast!
That's it! A super easy (and shiny) fix to torn up shoes! They were still not quite dry, but you get the picture. They look much better in person!

 
Xoxo,

Brandi abcdfghijklmno