Showing posts with label tutorial. Show all posts

Thursday, October 24, 2013

How to Fill in Brows Tutorial : Part One - Using a Gel and Powder Duo

In my opinion your makeup is not complete until your brows are filled in! Filling in brows and grooming them can totally transform your makeup look. I think it gives a more polished and complete look! Here is a quick  picture tutorial on using a gel and powder duo. I will do a part two with your basic brow pencil as well.


1) Grab your tools! For this tutorial I am going to use a gel and powder duo from elf cosmetics. You can pick this up for under $4.00! It comes with a dual brush inside, but I'm also going to use a brow brush from Avon. I am also using a brow comb.
 
2) This is the before picture! Nothing is on my brows yet!
 
3) Dip your brush in your brow gel. You don't need a lot. It goes on very well and has great coverage.
 
4) I start at the inner part of my brow and work my way to the outer side. I am doing the bottom of the brow area first.
 
5) Working toward the middle of the brow.
 
6) This shows the outer edge. The outside of the brow is going to be thinner than the inside.
 
7) I tapered off the end and made sure it was where it needed to be as far as length. You definitely don't want to make your brows appear too long! Be careful of that! You should have a defined brow area.
 
8) Using my brush and gel I am going to start working on the top of the inner part of my brow. Make sure you don't go too high!
 
9) After that I will define the brow and make sure the brow shape is where I want it to be!
 
10) Once your shape or outline is complete you are going to want to fill in the sparse areas with the gel. Again a little goes a long way!
 
11) To set the gel I used the powder that was included in my duo. I am using the included applicator for this step. Just dab the bush in the powder and pat onto the brow area.
 
12) After I have finished with the brow duo I like to use a brow comb to finish grooming my brows. The brush side will help eliminate any gel that is too "thick" looking or any "clumpy" areas.  You can also use a clear brow gel or setting gel (looks like a clear mascara) to hold thicker brows into place! I skipped this step today.
 
Below step 12 shows a filled brow versus a non filled brow. Can you see the difference it makes??
 
Viola! The completed look.


Stay tuned for part two of my brow tutorial when I show you how to fill brows using a pencil! Its super easy!!
 
  
I hope you are all having a fabulous week!


Sunday, September 8, 2013

"Face" Facts : Six Part Makeup Series to Break it all Down!

While under my blanket and cozy in bed I had an idea..."What about a makeup series?". That's when I normally get my ideas...when I'm laying there trying to fall asleep. It seems like right before I doze off something hits me and I'm back up jotting down notes or full out writing.

I will be doing a six part series on makeup and everything you need to know. We are going to break it down! I will go into detail about all the various makeups, brands, types, etc. It's going to be great! I will try to add in a few tutorials or instructional pictorials too. I've had several emails asking various questions that I will be answering in this series.

Makeup

The six part Face Facts makeup series will include :

Part 1 - From Primer to Powder: this will be everything you need to know from primers, concealers, foundations, and powders.

Part 2 - Highlighting, contouring, blushes, and bronzer.

Part 3 - Your face shape and brows

Part 4 - Eyes

Part 5 - Lips

Part 6 - Nails

Keep in mind each part will have details on what the different products do, how to use them to your benefit, tips and tricks, and more! Stay posted for part one!


Wednesday, October 3, 2012

Highlighting and Contouring : Tutorial, Product Info, and What Works

Ok, several people have asked me how I do my makeup. I've had requests to do a video tutorial, but didn't get the chance to do that yet. I'm working on it!

I had a long discussion with someone a few days ago about highlighting, contouring, and the best foundation types and colors for skin. That can get tricky! First I'll show you a a quick picture tutorial with directions on a quick full makeup look. We will go with a natural look today. Below that I'll touch on brands, types, and colors of foundations.

Highlighting and Contouring are similar for every face shape. Check out the chart below to see what I'm talking about, then we will get into my routine. Keep in mind everyone has a different routine or different way of putting on their makeup. Each person is different and you need to do what suits you best! This is the way I do mine. There is no right or wrong way to do this...unless you are using some crazy un-matching foundation, blush, bronzer etc.

Makeup


Here is a numbered picture guide of what I did. Check below for the how to directions. This is for a simple natural look.


1) Start with your base foundation. Prep your skin and apply concealer where needed. I used my NYC skin matching foundation that I picked up in my mini super cheap makeup haul! 2) You can apply your foundation in 3 ways. With a brush, sponge, or your fingers. Keep in mind if you do use your fingers make sure they are clean. Your skin absorbs oils left on your fingers and can further clog pores! I use a brush to apply and then smooth the edges at my neckline with a sponge. 3) This is the smoothing part. 4) There are several ways to highlight, but I am using a slightly lighter foundation. This is NYC smooth skin foundation in Ivory. This is another one of the products I grabbed on that makeup haul! 5) Put your highlighter on the areas shown. It looks like I put on a ton, but I really didn't! Then you are going to blend it in. 6) Next I put on a bronzer. I use a fan type brush for this, but couldn't find it today. You are going to use this to contour. 7) Check the picture and the chart above to see contour areas. 8) Next grab your blush. I used Avon's Smooth minerals in "blushed rose". 9) If you smile when you apply your blush you will see where to apply it. Blush goes on the round cheek area, bronzer goes below in the "hollow" area to contour. 10) If you put on a little too much blush or bronzer it can easily be toned down with translucent powder. 11) For my shadow I used the Neutral tones pallet from Avon. 12) I swept a light color all over the lid.13)  I took a dark brown and swept it across the upper lid and crease. 14) Then I took the darkest brown and put it in the crease area then came down to the outer edge of my eye. 15) Next grab your liner. I used Glimmersticks in black today. 16) Since this was a neutral look I stayed close to the lash line and made a thin line. 17) Mascara time. I used Maybellines Falsies today in brown/black. 18) Do a thin coat on top and bottom lashes. 19) Fill in your brows. You can use a powder base (even eyeshadow) or a pencil. If you use a pencil be careful because you don't want that "drawn on" harsh look. 20) Gently fill in brows. I used Glimmersticks brow liner in Blonde. 21) It will look something like this. Make sure you blend your shadows so you don't have harsh lines. 22) Grab your powder. You can use loose powder or a pressed powder. Don't over do it! Just lightly dust it on to set the look. 23) Time for the lips. I used Dollhouse pink. I dabbed it on my lips because I didn't want a lot of color, just a hint for this look. 24) That's it. The finished look.


Now, let's talk about brands, types, and colors!

Brands :
 To be honest I have tried everything from expensive designer brands to cheaper drugstore brands. The brand isn't the issue it's how well it works! Don't focus on the name focus on the results!

Types:


Foundation's have come such a long way over the years! There are so many different types and each type has several choices from there. Here is a brief list of foundation types and what they do!

Foundation 411

1) Cream to Powder : These come in compact style cases. They start as a creamy foundation and turn to powder on the skin. These are said to minimize oil and to last through the day. This is an easy option for those who don't like to deal with a lot of fuss with their foundation.

2) Liquid Foundation : There are so many varieties of liquid foundation. This one is the most common. It applies smoothly and you are able to put more where it is needed. There is waterproof, smudgeproof, long lasting, oil free, skin matching, etc. If you have sensitive skin or are prone to breakouts stay away from the waterproof and lean towards and oil free.

3) Powders : These are great for setting foundation and eliminating shine. Be careful as to how much you put on, because you don't want to clog pores or look like you have on a mask. If you can see it, then it's too much!

4) Mineral Foundation : These is a more natural approach to foundation. Some mineral powder can actually be good for your skin, while other's only claim to be. Mineral foundation should lightly lay on the skin. If you put on too much, or there are other additives in the product it will also look "cakey" like regular powder.

5) Whipped and Mousse Foundations: These are great because they go on smooth. They are great for aging and dry skin because they go on thin. Make sure not to over apply!

6) Concealer : This stuff can work miracles! It can hide dark circles, blemishes, and imperfections in skin. Even with concealer you want to watch your application. Putting too much will again cause "caking".

7) Tinted Moisturizer : This option is great for women who need a hint of color, but don't like the feeling of thick makeup. This is a minimal coverage option that evens skin tone and moisturizes at the same time.

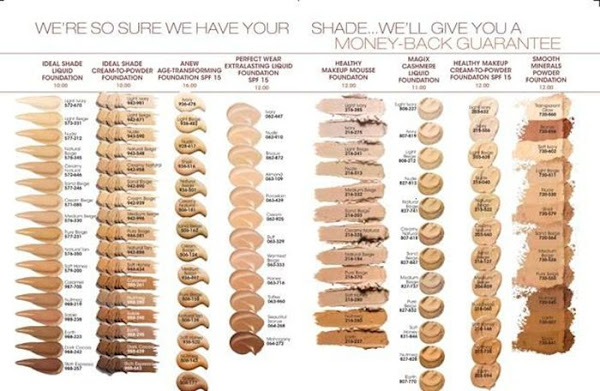
Colors/Shades:

 (Image c/o Avon)


 Finding the right shade is tricky. I explained in a post a few day's ago on how to correctly pick your shade and test samples. If you haven't seen it yet, check it out here! If you follow those guidelines and test on your cheek where I showed you will be able to find your shade. Another option that I am a huge fan of is mixing colors to create your perfect shade. I have done this several times to get as close to my natural skin tone as possible! Try it!

I hope some of these tips helped you guys out! Thanks for reading check back soon for my latest posts!


Xoxo,
Brandi  

Tuesday, September 18, 2012

Fringe Purse DIY : This is Easy!

I can't sew! I know I have said this a million times, but it's totally true! I found these scraps of leather (totally free) and decided I would keep them for a random craft project. I didn't really think I would be attempting to make a purse, much less one with fringe detail. It was actually easier than I thought. Here is my quick how to! The project took under two hours, but if you can actually sew and have a sewing machine I think it will go much faster!


1) Get your fabric/leather scissors, zipper, needle, thread, etc!


2) Flip fabric inside out and sew together bottom and sides. Keep the top open! Once you have done this turn the purse right side out.
 
 
3) Once you have flipped the bag now attach your zipper. I didn't get a chance to photograph this step!
 

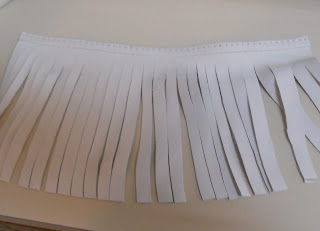
4) I measured three separate pieces of fabric to cut the fringe. Each section was the same length. You can decide what size you want your bag to be and go from there. Mine is 8in. Cut strips in your fabric/leather to make the fringe look.


5) This is how each of your three fringe pieces will look. I then attached them to the purse in rows about 2.5 inches apart starting at the top of the bag. You can see where they are attached in the photos below.
 
 
6) I grabbed some silver hardware and cut two smaller leather flaps. These will be used to attach the strap. Place the circle into the flap, fold over, and sew. You will then attach them to your purse.
 
 
7) Follow the step in number six to attach your strap.
 
 
8) Just for fun I added a fringe detail to the edge of the zipper while I was attaching the straps and hardware.
 
 
9) That's it! You're done! Now you have a super cute fringe purse ready to go! I think I can totally rock this bag! What do you think? Did I do ok for my first attempt at leather and purse making?


Tuesday, May 1, 2012

How To : Neutral Semi Smoky Eye DIY

My preferred and normal eye look is usually a smoky or semi smoky eye. I tend to use shades of gray for my look. My signature smoky eye can easily transform from day to night. Today I decided I would do a neutral tone smoky look. This is also an easy transformation from day to night. Here is a step by step guide for achieving the look.

Step One:

Start with a naked eye then add a primer. Concealer or foundation can also be used. This helps the shadow last longer on your eye and tends to show pigment better. I used Magic X from Avon.


Step Two: Determine your shade. This shade will go on the upper part of the eyelid. The shade will eventually be darkened, but use this as your guideline. I used the Avon 8 in 1 pallet.


You are going to take this shade and blend it onto the upper lid starting at the outer V of your eye. Then go across the upper lid to the inside V of your eye.


When you are finished with this step your eye should look something like this. Since this is a neutral pigment it is harder to see in the picture.


Step Three:

Pick your darker shade. I am going to use the two shades on the end.


Take the lightest of the two and retrace your outer edge to about midway across the lid. Take the darkest shade and fill in the outer V and crease area of your lid.


Don't worry this will get blended soon!

Step Four:

Take one of the light shades and pat down on your eyelid. You are also going to take this shade to highlight your brow bone.


Take your brush and lightly blend your colors. If there is any extra darker pigment in the outer V you will take that and sweep it along the outer V and under the bottom lashes.


Step Five:

Now its time to line your eyes! I used Ulta liner in Chocolate.


Line your lid all the way across and then line the inside of the bottom like this...


Step Six:

Now its time to fill in your brows if you need to and wipe any excess shadow from around your lid. Q-tips work great for this!

Step Seven:

Finally add a few coats of mascara to complete your look!


That's it! You're all done!


Here's the finished look. I pulled my hair back for a natural look.


Don't be affraid to add a pop of color with a bright lip!


Happy Tuesday everyone! See you guys soon!


Xoxo,
Brandi