Showing posts with label How to. Show all posts

Monday, June 19, 2017

Easy Ways To Make Money and Get FREE Products | Work from Home Ideas for Anyone

Everyone is always looking for ways to earn extra money, but the problem is that most of us don't have a lot of extra time. It doesn't matter if you are young or old, single or married, a parent or don't have kids of your own there are simple and fun solutions to earn you money that you can do from home!

I know there are plenty of options in addition to the ones I'm giving you today, but I only wanted to share what I have personally done or currently do to earn extra money! I don't want to send you all over the internet chasing hopes and dreams that aren't easy to fulfill. That wouldn't help anyone!

Below you will find different categories to search from. You can click each link to find out more information. The link will open in a new window, so don't worry you won't lose your place on the page! I have personally done each of these and have actually made money in all these categories!


t


START A BLOG OR YOUTUBE CHANNEL

I started blogging and writing for fun or as a hobby. That hobby has been such a great opportunity though! I have been paid by several different companies for content and have been featured on several different sites. In addition to being paid for content I got some awesome perks and a good bit of free goodies! You will find out more about that below!

When you start a blog you can get an adsense account through Google. This will allow you to monetize your blogs and get paid for views and clicks! Other sites can advertise in the sidebar of your blog and you are the one to get paid! Yes, you get paid for doing no additional work!


Untitled #355


FREELANCE WRITING OR SPONSORED WRITING & FREE PRODUCTS

These sites pay you for your opinion or for writing sponsored content. Some of these awesome companies send you products just to test out! They are only looking for your honest opinion so you only need to write what you know! You get to test out so many different products from a variety of categories. You select your iinterests and they match you to campaigns. I love these sites and still use them today! Who doesn't love free goodies?

1) Influenster was one of the first companies I started with and they have always been faithful! I have     gotten so many products and voxboxes filled with goodies from this awesome company! I highly       reccomend them to women and men alike! This is a site anyone can use!

2) BzzAgent is another company that has always been great sending awesome products. I have tested     everything from household products to ice cream! This is another site good for both women and         men!

3) Smiley360 has also been a fun site that sends a variety of products!

4) Izea Media which used to be Pay Per Post is a great site for product links! You post the link, get clicks, get purchases, and get paid! It is great for anyone!

b


SURVEY SITES THAT ACTUALLY PAY!

I have personally used these sites and still do! I made over $50 in just a few days for a few hours of surveys! It is easy, fun, and really works! These sites pay via check, paypal, or gift cards to your favorite sites! Make sure to check them out! I am a member of all of these!

5) Global Test Market is one of my favorites I was paid very quickly and the surveys were quick and       simple! It was such an easy way to make extra money!

6) Survey Junkie was another site that paid really fast! Again perfect for anyone!

7) Swagbucks earns you some great rewards and has easy ways to earn besides just surveys!

8) MyPoints is similar to Swagbucks and has easy and fun ways to earn! You can even watch video         clips on topics you pick to earn! How awesome is that?

9) Valued Voice is next on the list. Easy and simple!


av


I don't want to leave off without telling you about one last opportunity that worked out great for me and so many other people I know! Have you ever heard of Avon? That is a silly question, because I'm sure most of you have! Avon has been around since I can remember, but so much has changed! Avon is not just makeup! Avon offers so many amazing products at seriously incredible prices. The quality of products is outstanding and the fact that this company has been in business for over 130 years says a lot! They aren't going anywhere any time soon!

I was a member of Avon years ago and recently did a first impressions video of some new products I was testing out. That got me thinking! I decided that it would be such a great fit for me to do again! If you love working from home, setting your own schedule, makeup and beauty, home goods, fragrance, and fashion then this company is for you! Did I mention you get a SERIOUS discount!!!

Not only can you work from home, but you also get an online store through Avon for FREE! Yes, you get an online website already designed and ready to go for your customers to shop from in the comfort of their own home! They shop and you get paid! You can also promote your items on social media and, of course, share links with your friends directly from your store!

There are some great incentives to sign up now! You can also kick start your work from home goals by signing up with ME! That's right! I would love to have you on my team and start this journey with you! It doesn't matter what city or state you are in because Avon has recently started training and even having some awesome meetings online! It's a great opportunity! Click HERE and if asked enter code brandijones OR feel free to message me HERE and click on contact!

I will make sure to update you if I find any other good sites that have proven to work! I hope everyone has an amazing day! Love and Hugs as always!!


Friday, October 19, 2012

The Truth About Skin Care : Tips and What I Learned

Throughout my teen years I had amazing skin. I rarely had breakouts and my skin always seemed to have a healthy glow. I thought because of that I was in the clear from future skin problems. Wrong! I'm about two weeks shy of turning thirty and have had more skin issues throughout my twenties than ever before. Because of this I have done tons of research on skincare and various products that claim to eliminate all of them. One thing I learned is that just because a product works on one person does not mean it will work on another. Here are a few things you need to know, and a few tips I learned along the way!

Everyone has pores! Some pores appear larger than others. Every hair on your body has a pore. Dirt and debris collect around your pores and eventually clog them. Underneath the tiny hairs on our face and under our pores are glands. These glands produce sebum. Sebum acts as our skins natural moisturizer. If our skin is not cleaned properly the sebum builds up and causes blemishes, white heads, blackheads, etc.

Over the years I have tried several different products that claim to eliminate zits, pimples, white heads, black heads, and say they eliminate dead skin cells which cause future clogging of pores. Some products have worked well, while others just don't!

Healthy Skin

 
Cleansing Your Skin
It is so important to properly cleanse your skin. While doing research on skincare I learned that the best way to clean your skin is to first open your pores. Since oil, dirt, and debris collect in your pores we need to unclog them. You can either steam your skin or use a hot cloth to enlarge your pores. Once you do this wash your face with your cleanser. Do this for a week and you will see a huge difference!
 
To Pop or Not To Pop
It is so hard when you see a huge zit on your face not to pop it! If you are anything like me then you don't want to walk around with a gross puss filled pimple in the middle of your face. I don't care what anyone says it somehow becomes the main focus of your face. Yuck! Another thing I hate is how white heads and black heads look. Whiteheads are those white or yellowish bumped up circles that somehow manage to pop up all over. Blackheads appear dark and cause your pores to look larger and almost dirty.
 
I'm not going to sit here and tell you to start popping every bump on your face, but I can tell you that if you are already a "popper" there is a better and easier way to do this without hurting your skin! That's good news!
 
First of all there is a facial tool you can use called an extractor. This is a better way of getting rid of those pesky bumps other than digging your fingernails into your skin. We all know that leaves marks on your face and causes the skin around the bump to become red. This is what they look like.
 
 
Here is the best possible way I have learned to perfectly remove whiteheads, and this really does work!
 
Steam your face! You can heat a pot of water and then place your face above it with a towel covering your head. Do this for a few minutes and you will notice your pores opening up. If you don't want to try this method a hot washcloth applied to your face for several minutes will do about the same.
 
Once you have steamed your skin your pores are now opened. This will make extracting pesky problems so much easier. Use your extractor tool and press gently into the skin. If you have to press too hard then you might want to wait a day or two more and try again. The whitehead/blackhead should come right out.
 
After you have extracted the problem areas cleanse your face. To close your pores you can take an ice cube wrapped in a cloth and rub across your skin.
 
A few weeks ago I noticed I had a good bit of whiteheads. They were driving me crazy and no matter what I did they wouldn't go away! I used this method and was amazed at how well they were extracted. I also use the steam method before cleansing at least once a day. Because I am limited on time I use the hot washcloth to open my pores then use a cleanser. It's also great to do this before applying a treatment mask. In less than a week my skin looks 99% better! No kidding!
 
Products
I mentioned earlier that not all products work for everyone. It is important to find a product that works for you! When you find one stick with it! Continuously changing products can also irritate your skin. Remember to always remove your makeup at the end of the day and if you don't like toners make sure you at least cleanse with a good cleanser! On top of that don't forget your moisturizer! That is a very important step!
 
I hope these tips helped and if you want further information or a detailed how to let me know and I will be happy to do a follow-up post!
 
Xoxo,

Brandi

Wednesday, October 3, 2012

Highlighting and Contouring : Tutorial, Product Info, and What Works

Ok, several people have asked me how I do my makeup. I've had requests to do a video tutorial, but didn't get the chance to do that yet. I'm working on it!

I had a long discussion with someone a few days ago about highlighting, contouring, and the best foundation types and colors for skin. That can get tricky! First I'll show you a a quick picture tutorial with directions on a quick full makeup look. We will go with a natural look today. Below that I'll touch on brands, types, and colors of foundations.

Highlighting and Contouring are similar for every face shape. Check out the chart below to see what I'm talking about, then we will get into my routine. Keep in mind everyone has a different routine or different way of putting on their makeup. Each person is different and you need to do what suits you best! This is the way I do mine. There is no right or wrong way to do this...unless you are using some crazy un-matching foundation, blush, bronzer etc.

Makeup


Here is a numbered picture guide of what I did. Check below for the how to directions. This is for a simple natural look.


1) Start with your base foundation. Prep your skin and apply concealer where needed. I used my NYC skin matching foundation that I picked up in my mini super cheap makeup haul! 2) You can apply your foundation in 3 ways. With a brush, sponge, or your fingers. Keep in mind if you do use your fingers make sure they are clean. Your skin absorbs oils left on your fingers and can further clog pores! I use a brush to apply and then smooth the edges at my neckline with a sponge. 3) This is the smoothing part. 4) There are several ways to highlight, but I am using a slightly lighter foundation. This is NYC smooth skin foundation in Ivory. This is another one of the products I grabbed on that makeup haul! 5) Put your highlighter on the areas shown. It looks like I put on a ton, but I really didn't! Then you are going to blend it in. 6) Next I put on a bronzer. I use a fan type brush for this, but couldn't find it today. You are going to use this to contour. 7) Check the picture and the chart above to see contour areas. 8) Next grab your blush. I used Avon's Smooth minerals in "blushed rose". 9) If you smile when you apply your blush you will see where to apply it. Blush goes on the round cheek area, bronzer goes below in the "hollow" area to contour. 10) If you put on a little too much blush or bronzer it can easily be toned down with translucent powder. 11) For my shadow I used the Neutral tones pallet from Avon. 12) I swept a light color all over the lid.13)  I took a dark brown and swept it across the upper lid and crease. 14) Then I took the darkest brown and put it in the crease area then came down to the outer edge of my eye. 15) Next grab your liner. I used Glimmersticks in black today. 16) Since this was a neutral look I stayed close to the lash line and made a thin line. 17) Mascara time. I used Maybellines Falsies today in brown/black. 18) Do a thin coat on top and bottom lashes. 19) Fill in your brows. You can use a powder base (even eyeshadow) or a pencil. If you use a pencil be careful because you don't want that "drawn on" harsh look. 20) Gently fill in brows. I used Glimmersticks brow liner in Blonde. 21) It will look something like this. Make sure you blend your shadows so you don't have harsh lines. 22) Grab your powder. You can use loose powder or a pressed powder. Don't over do it! Just lightly dust it on to set the look. 23) Time for the lips. I used Dollhouse pink. I dabbed it on my lips because I didn't want a lot of color, just a hint for this look. 24) That's it. The finished look.


Now, let's talk about brands, types, and colors!

Brands :
 To be honest I have tried everything from expensive designer brands to cheaper drugstore brands. The brand isn't the issue it's how well it works! Don't focus on the name focus on the results!

Types:


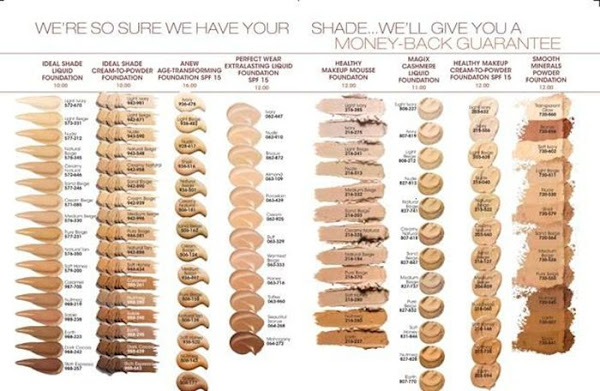
Foundation's have come such a long way over the years! There are so many different types and each type has several choices from there. Here is a brief list of foundation types and what they do!

Foundation 411

1) Cream to Powder : These come in compact style cases. They start as a creamy foundation and turn to powder on the skin. These are said to minimize oil and to last through the day. This is an easy option for those who don't like to deal with a lot of fuss with their foundation.

2) Liquid Foundation : There are so many varieties of liquid foundation. This one is the most common. It applies smoothly and you are able to put more where it is needed. There is waterproof, smudgeproof, long lasting, oil free, skin matching, etc. If you have sensitive skin or are prone to breakouts stay away from the waterproof and lean towards and oil free.

3) Powders : These are great for setting foundation and eliminating shine. Be careful as to how much you put on, because you don't want to clog pores or look like you have on a mask. If you can see it, then it's too much!

4) Mineral Foundation : These is a more natural approach to foundation. Some mineral powder can actually be good for your skin, while other's only claim to be. Mineral foundation should lightly lay on the skin. If you put on too much, or there are other additives in the product it will also look "cakey" like regular powder.

5) Whipped and Mousse Foundations: These are great because they go on smooth. They are great for aging and dry skin because they go on thin. Make sure not to over apply!

6) Concealer : This stuff can work miracles! It can hide dark circles, blemishes, and imperfections in skin. Even with concealer you want to watch your application. Putting too much will again cause "caking".

7) Tinted Moisturizer : This option is great for women who need a hint of color, but don't like the feeling of thick makeup. This is a minimal coverage option that evens skin tone and moisturizes at the same time.

Colors/Shades:

 (Image c/o Avon)


 Finding the right shade is tricky. I explained in a post a few day's ago on how to correctly pick your shade and test samples. If you haven't seen it yet, check it out here! If you follow those guidelines and test on your cheek where I showed you will be able to find your shade. Another option that I am a huge fan of is mixing colors to create your perfect shade. I have done this several times to get as close to my natural skin tone as possible! Try it!

I hope some of these tips helped you guys out! Thanks for reading check back soon for my latest posts!


Xoxo,
Brandi  

Monday, June 11, 2012

Black on Black : Style Ideas

Here are a few ideas on how to style black on black. The accessories are what make the outfits pop!

Black on Black

Photobucket

Wednesday, June 6, 2012

In Your Clutch Bag : What to Carry

Yesterday I did a post on evening wear and I showed the looks with clutch bags. Here are my tips on what should go in your clutch!

In your clutch bag

In your clutch bag by flairbybrandi featuring lodis bags

1) Compact powder
2) Lipstick
3) Mascara
4) Clear polish in case your panty hose starts to run. It will stop it in its tracks!
5) Safety pins in case something comes apart or needs to be tucked!
6) Eyeliner
7) Mini wallet
8) Drivers License (no that's not a real one in the pic)
9) Credit/Debit Card
10) Cash
11) Phone
12) Breath mints
13) Wisp if you don't want the mints(these are mini tooth brushes!)
14) Hand sanitizer ( I don't leave the house without mine!)

Photobucket

Tuesday, May 1, 2012

How To : Neutral Semi Smoky Eye DIY

My preferred and normal eye look is usually a smoky or semi smoky eye. I tend to use shades of gray for my look. My signature smoky eye can easily transform from day to night. Today I decided I would do a neutral tone smoky look. This is also an easy transformation from day to night. Here is a step by step guide for achieving the look.

Step One:

Start with a naked eye then add a primer. Concealer or foundation can also be used. This helps the shadow last longer on your eye and tends to show pigment better. I used Magic X from Avon.


Step Two: Determine your shade. This shade will go on the upper part of the eyelid. The shade will eventually be darkened, but use this as your guideline. I used the Avon 8 in 1 pallet.


You are going to take this shade and blend it onto the upper lid starting at the outer V of your eye. Then go across the upper lid to the inside V of your eye.


When you are finished with this step your eye should look something like this. Since this is a neutral pigment it is harder to see in the picture.


Step Three:

Pick your darker shade. I am going to use the two shades on the end.


Take the lightest of the two and retrace your outer edge to about midway across the lid. Take the darkest shade and fill in the outer V and crease area of your lid.


Don't worry this will get blended soon!

Step Four:

Take one of the light shades and pat down on your eyelid. You are also going to take this shade to highlight your brow bone.


Take your brush and lightly blend your colors. If there is any extra darker pigment in the outer V you will take that and sweep it along the outer V and under the bottom lashes.


Step Five:

Now its time to line your eyes! I used Ulta liner in Chocolate.


Line your lid all the way across and then line the inside of the bottom like this...


Step Six:

Now its time to fill in your brows if you need to and wipe any excess shadow from around your lid. Q-tips work great for this!

Step Seven:

Finally add a few coats of mascara to complete your look!


That's it! You're all done!


Here's the finished look. I pulled my hair back for a natural look.


Don't be affraid to add a pop of color with a bright lip!


Happy Tuesday everyone! See you guys soon!


Xoxo,
Brandi