There is no secret that sequin and glitter shoes are a great fashion statement! These shoes can range from heels, sandals, flats, flip flops, and more. I loved the look, but so many of the cute heels are over 4 inches! I am 5'9 without shoes, so the thought of being over 6 foot doesn't thrill me! My husband loves me in heels, but since he is only an inch taller than me I try not to go any more than 3-4 inches in heels!
These shiny and sparkly shoes are everywhere! These great shoes are being made not only in a range of styles, but by a range of designers! From Christian Louboutin and Valintino to your Target and Payless Stores everyone has their version of this popular shoe!
Here are two of popular brands of the super shiny shoes! Left is Louboutin and the right is Miu Miu. These two pairs will cost into the thousands!! I decided since I've been on my DIY kick I would make my own! The entire project cost less than $10!
Here's what I did... (and what you need!)
Supplies:
Shoes (Any style is fine. I used pumps)
Modge Podge
Paint brush or sponge brush
Glitter
Tape
I picked up a pair of black pumps at Goodwill. I wanted a rounded toe pair, and found the perfect ones! These are by H&M and cost $2.00. You can use any color or style of shoe, but this was my preference!
Here are the black shoes. As you can see they have a few minor scuff marks, but that is totally fine! It will all be covered soon!
I took my modge podge and my glitter and mixed them together in a cup. The amount of glitter is up to you. It depends on how sparkly you want your shoes! I'm going all out on mine!
Next you can tape the heel or bottom of your shoe. I started to tape them, but then decided I didn't really need to do this! It isn't totally necessary, but you will want to make sure you are neat in the painting process or you will end up with glitter everywhere! Also if you intend to glitter the heel you won't need to tape that area only the under side of the shoe.
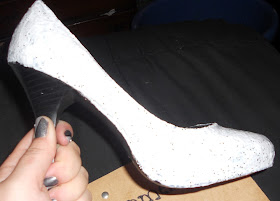
Now here's the fun part! Start painting on the glitter! This is my first coat.
And the second coat. Don't worry the modge podge will dry clear!
I put on about 4 coats to get the coverage I wanted! Then it was time to tape the bottom side of the shoe. And glitter the heel. My initial idea was to leave the heel plain, but I changed my mind! That happens sometime (me changing my mind lol).
After I glittered the heels I peeled the tape off the back and decided for an extra pop I would paint the bottom of the shoe a mauve/burgundy color. I would have loved to go for a hot pink, but ran out of that color! For the bottom I used a small bottle of enamel paint. And gave it two coats. Then I brushed a layer of just the modge podge over the shoe one last time. I did this to set the glitter!
After it dries you have your final product! Super sparkly sexy glitter heels for under $10! You cant even beat that deal at payless! I'm happy with my new shoes! Let me know if you try this out! I would love to see pictures of your shoe creation!
These aren't totally dry,but you can see how they will turn out!
Xoxo,


Awesome DIY! I'm so ready to paint some shoes.
ReplyDelete